2015-05-13

[讀書筆記] [Continuous Delivery] Build and Deployment Scripting

Build and Deployment Scripting

Introduction
簡單的專案可以用簡單的方法進行建置與部署

只要專案規模稍微複雜點 建置與部署就會出現以下問題 :

  • 步驟會越來越繁複
  • 所需時間也會越長
  • 人工容易出錯


強烈建議使用Script來達成建置與部署的自動化

An Overview of Build Tools

  • Make & SCons
  • Ant
  • NAnt and MSBuild
  • Maven
  • Rake
  • Buildr
  • Psake


各個建置工具的不同點在於
任務導向
    e.g. Ant, NAnt and MSBuild
    根據一系列的任務來描述建置相依性
    不保存狀態(完全不適合C++)
    但對C# 沒有問題
    for example :
          要完成Init 或 Setup test data 的task之後 進行 compile source and test
          儘管很多task都必須依賴Init , 但執行過一次之後就不會再執行
 
產品導向
    e.g. Make
    跟據一系列的檔案來描述建置相依性
    增量式建置(C/C++)
    for example :
           確保compile source 跟 compile test之後的產出出來之後
           利用時間戳記來確是否進行Run Test


(1) Make & SCons
      http://zh.wikipedia.org/wiki/Make

      優點 :
                  (i) 能在單次建置中追蹤相依關係 只建置受本次修改影響的元件
                  (ii) 使用簡單
      缺點 :
                  (i) 相依複雜度增加時會難以除錯
                  (ii) 現代語言的IDE已經幫忙處理這塊
                  (iii) 依存在Shell上 (UNIX)

     “This is one of those days when I am not happy with software. It sometimes surprises me how many of those days involve Make.”
—Mark Dominus, “Suffering from ‘make install’”

      現在許多C/C++ Project的Developer都推薦使用SCons
       Why ?
                 1. Python 寫的
                 2. 支援Windows和並行建置

(2) Ant
      參考文件
      http://zh.wikipedia.org/wiki/Apache_Ant

      【認識 Gradle】(1)講古的時間 Apache Ant     
   
     優點 :
                (i) Jave寫的, 強大跨平台的能力
                (ii) Script用XML寫的
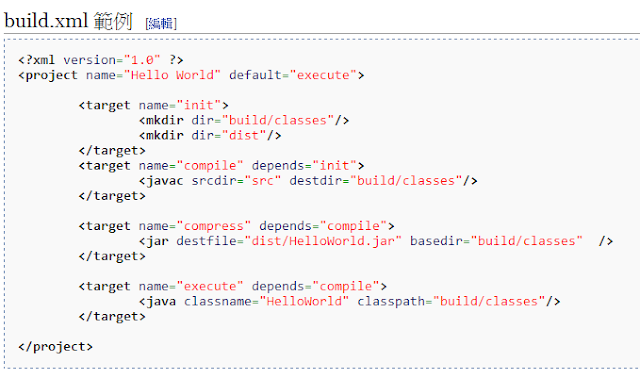
               
     缺點 :
                 (i)  XML不簡潔
                 (ii) 領域模型非常貧乏, 要耗費大量時間來編譯,產生jar,執行測試以及編寫樣板檔
                 (iii) 宣告式語言
                 (iv) 無法回答 執行了多少測試? 需要多久?
                 (v) Ant檔非常冗長 也難以重構

     若要使用Ant 推薦Julian Simpson寫的文章:
     “Refactoring Ant Build Files,” in The ThoughtWorks Anthology.      

(3) NAnt and MSBuild
     https://msdn.microsoft.com/zh-tw/library/0k6kkbsd.aspx

     Microsoft當初在導入.NET Framework時 很多Java的Developer將他們喜愛的工具移植到.NET上
   
     Ant  -> NAnt
     NAnt 變體 -> MSBuild

     MSBuild
     優點 :
                 (i) 與Visual Studio 緊密結合, 管理相依性較容易                
     缺點 :
                 (ii) 與Ant相同

(4) Maven
     http://zh.wikipedia.org/wiki/Apache_Maven
     【認識 Gradle】(2)講古的時間 Apache Maven

     Convention over configuration

     Maven被創造出來的動機如下 :
     (i) JAVA專案的標準化 -> 消除Ant大量樣板的問題
     (ii) JAVA專案函式庫管理的問題

     缺點 :
                (i) 缺乏彈性 : Project必須按照Maven規定的結構與生命週期
                (ii) XML
                (iii) 在預設與設置中, 總是自動更新自己 => 可能會導致不可預期的失敗

(5) Rake
      
     產品導向
     要安裝Ruby執行環境
     要用RubyGem建置

(6) Buildr
     
      Buildr 建立在Rake之上, 能做到Rake能做到的事
      作者推薦 如果想找Ant 或 Maven的替代品 強烈推薦 Buildr
      如果喜歡Groovy 就用 Gradle
    
(7) Psake
      
      支援Windows
      用PowerShell寫的內部DSL

Principles and Practices of Build and Deployment Scripting
以下將會提到幾點原則與實踐:


  1. Create a script for each stage in your deployment pipeline
  2. Use an appropriate technology to deploy your application
  3. Use the same scripts to deploy to every environment
  4. Use OS's packaging tools
  5. Ensure the Deployment Process is Idempotent
  6. Evolve your deployment system incrementally
(1) Create a script for each stage in your deployment pipeline
當Project開始時 或許可將script都寫在同一個檔案中
但是 一旦script變得太長 就要將它分成獨立的腳本

要確保所有的script都放在version control repository

(2) Use an appropriate technology to deploy your application
當我們在做自動化部署時 要使用合適的工具 而非general-purpose scripting language

Q : 何謂合適的工具?

When and Who?
在Project一開始就要進行時, Developers, testers, and operations staff都要一起來做部署
要一起決定部署的工具

CASE : One Telecoms Company

(3) Use the same scripts to deploy to every environment

使用相同的預設script部署到所有的環境
環境設置資訊必須分開管理

(4) Use OS's packaging tools
Problems : "將一堆檔案分別部署到檔案系統的不同位置" 效率又低且維護麻煩

要考慮到 upgrades, rollbacks, and uninstalls

Solution : 強烈建議使用 OS's Packaging Technology
For example :

  • Debian and Ubuntu : Debian Package System
  • RedHat and SuSE : RedHat Package System
  • Windows : Microsoft Installer System


也可以考慮使用platform-specific packaging system :
For example :

  • Ruby Gems
  • Python Eggs
  • Perl's CPAN


但如果可以 仍是推薦使用OS's Packaging Technology

(5) Ensure the Deployment Process is Idempotent
Idempotent : 無論做幾次 結果都要一樣

無論target environment現在處於什麼情況 當部署完畢之後target environment 上的狀態都要一樣

How to do?
1. 以已知狀態良好的環境當作起點
2. 驗證環境所需假設

每次部署時都應該根據version control 的某個單一修正版本產生的Binary從頭開始
當部署某元件時 就應該將相關的原件都重新部署一次 (Rebuild)

3個例外

  • (i) Clustered System (Chapter 10)
  • (ii) 應用程式是由多元件(不同version control repositories) => 要通過測試相關的所有元件組合 才可以只部署變更的元件
  • (iii) 使用可以讓效果Idempotent的Tool

(6) Evolve your deployment system incrementally
從簡單的小事開始做起
循序漸進

Deployment Scripting

核心原則 : 完全自動化

不要再遠端登入到環境上執行部署動作!!!

三種scripted deployments的方式 :
(1) 寫一支script 執行所有工作 (For  一台機器)
(2) 遠端部署 (For 多台機器)
(3) Script your own deployments (如果上述方法都不適用)

(1) 寫一支script 執行所有工作 (For  一台機器)
     因為只有一台機器 所以可以用一個script在local端執行所有工作

(2) 遠端部署 (For 多台機器)
      A set of deployment scripts
     (2.1) 寫script並登錄到遠端每台機器上執行
     (2.2) 在Local端寫script 利用agent在遠端每台機器上執行
     (2.3) 利用合適的OS's packaging technology
              第三種作法是最powerful
               why ?
               2.3.1 Idempotent
               2.3.2 管理部署及基礎建設可在同一套Tool上 不同團隊較容易溝通

    如果2.3找不到或無法使用這套方法
    找找看是否有包含Agent model的CI Server

(3) Script your own deployments (如果上述方法都不適用)

Deploying and Testing Layers

原則 :
總是把根基紮在已知狀態良好的基礎上


只有環境都設置完成 才能開始部屬軟體

Testing Your Environment’s Configuration

任何層次部屬出錯 都有可能造成應用程式無法正常執行
所以每個層次都需要進行測試

如果Fail 就讓環境設置流程快速失敗

For example :

  • Confirm that we can retrieve a record from our database.
  • Confirm that we can contact the website.
  • Assert that our message broker has the correct set of messages registeredin it.
  • Send several “pings” through our firewall to prove that it allows our traffic and provides a round-robin load distribution between our servers.


Tips and Tricks

  • Always Use Relative Paths
  • Eliminate Manual Steps
  • Build In Traceability from Binaries to Version Control
  • Don’t Check Binaries into Version Control as Part of Your Build
  • Test Targets Should Not Fail the Build
  • Constrain Your Application with Integrated Smoke Tests
  • .NET Tips and Tricks


(1) Always Use Relative Paths
建置中最常見的錯誤就是預設使用絕對路徑 (相依性)

所有位置都必須是相對路徑
能確保每個建置都是完整獨立的

如果不得不使用絕對路徑 請確保
1. 這是特例
2. 必須與建置系統相互獨立

盡量減少安裝於非標準位置的路徑

(2) Eliminate Manual Steps
"A bad system will beat a good person every time" 
by W. Edwards Deming

只要是手動 一定容易出錯

何時要考慮自動化呢?
當你不得不做第2次時

(3) Build In Traceability from Binaries to Version Control

確定某個Binary是由版本控管哪個版本產生
版本化的metadata

(4) Don’t Check Binaries into Version Control as Part of Your Build
不要把Binary當作建置的一部分check in進Version Control

因為我們總是能從重新建置一份

將Binary或是Report存到File System就好

經驗法則 :
不要將建置, 測試和部署期間產生的任何產出check in 進 Version Control
而是要將他們當作Metadata

(5) Test Targets Should Not Fail the Build
本書覺得不好的作法是 任何一個Fail都導致建置失敗

原因是 :
若是某個Unit Test Fail就導致Build Fail , 我們不曉得之後是否有更多測試沒過
要等下次建置才會測到未測到的部分, 一來一往之間更浪費時間

Solution :
1. 紀錄當下的錯誤 並註記1個 Flag
2. 經過完整的測試之後 根據Flag決定是否讓Build Fail

(6) Constrain Your Application with Integrated Smoke Tests

在部署之前另部署script檢查一下環境是否正確

(7) .NET Tips and Tricks
Problem 1
.NET .sln and .csproj 會記錄實際建置專案時所引用的reference, 但很有可能某個file已經不被引用了 但仍存在 file system中
Solution
在全部的sln中打開顯示隱藏檔案的屬性 , 刪除沒用到的File

Summary
script 可以輔助我們進行建置,測試,部署和發佈應用程式
請找出最痛苦的步驟, 開始嘗試自動化, 逐步完善自動化建置與部署的能力
Build and Deployment Scripting必須貫穿整個開發流程

2015-04-28

需求怎麼估? - Animal Point Workshop Part II - 實際動手玩

需求怎麼估? - Animal Point Workshop

前情提要

需求怎麼估?  - Animal Point Workshop Part I - 估需求前必須知道的事


Previously 我們討論了估需求前必須知道的事
提到了
三個基本原則 : 
  • 相對比較 絕對評估 簡單
  • 小任務 大任務 容易掌握
  • 使用 Planning Poker 來估

點注意事項:
  • Who : 做事的人一起
  • When : 被分派任務就估
  • What : 評估時請考慮複雜度重複性風險

現在就要帶大家來體驗一下Animal Point Workshop


遊戲故事的假設是這樣的:
今天你們是個動物園管理團隊,要評估幫動物們洗澡的複雜度。
團隊裡角色只有兩種
1.     Product Owner
Product Owner(PO)要解釋有關動物洗澡的任何需求,所以當團隊翻出新的動物牌卡時,PO要天馬行空地描述需求,假若Team Member對於需求有任何的疑問,PO要解答團隊的疑惑。(但要注意的是,PO不要主動地引導,for example:我覺得不是這樣)
2.     Team Members
Team Members 則是實際要幫動物們洗澡的員工,他們必須一起評估每個動物洗澡的需求複雜度。過程中若是對需求不清楚則是要趕快找PO確認細節。

圖為PO解釋需求中


Step 1 : 比較大小
注意事項:團隊成員輪流出動物牌卡,一次只能移動一張卡 (翻新圖卡或挪動現有圖卡)
步驟:
          (1) Member A隨機抽一張新牌卡,PO解釋新牌卡的需求。
          (2) Member B隨機抽一張新牌卡,PO解釋新牌卡的需求。Member B要比較現有牌卡的複雜度,小的擺左邊,大的擺右邊。挪動時請向Team說明理由。
          (3) Member C 可以選擇以下兩種方式
                   i. 抽新卡如同步驟(2)
                   ii. 挪動現有牌卡。挪動時請向Team說明理由。

          (4) 重複步驟(2)或是步驟(3)直到全部的牌卡都抽出以及大家都同意現在的排序。

結束這個步驟之後,會得到一串經過排序的牌卡


Step 2:校正基準
兩套校正的方法

(1) 歷史基準
由於SCRUM裡評估的Story Point都是相對的,所以每個Sprint 或是每個Release估出來的數值無法拿來比較。這邊採用歷史基準的原因就是想要讓每一次的評估都可以校正為統一的標準。
所以校正的方式是拿出過去評估的需求,首先要評估這個需求可以插在剛剛排序完卡列中的哪個位置?
For example:
假設小黑熊在過去評估的複雜度為8點,將他放置在現有排序中,則小黑熊8點就是這次的基準參考點。


(2) 定義最小
若是不想採用歷史基準或是沒有歷史資料,那就就這次的需求來估算吧。上一集有提到原則二:小任務估算比較有信心、比較精準。所以我們可以拿目前最小的需求來估算點數。
For example:
假設這次團隊所排序最小的需求是幫天竺鼠洗澡,經過Planning Poker的過程估出複雜度為3點,那麼這次的需求複雜度就是由3點起跳。


Step 3 : 評估程度
注意事項:
團隊成員輪流出點數,一次只能更動一個點數
若相鄰多張圖卡皆評估為相同點數,請將該點數放置在最左邊的圖卡
步驟:
          (1) Member A檢視桌上的排序,依照基準比例,挑選合適的一張點數放置在任何一張牌卡上。
          (2) Member B可以選擇以下兩種方式
                     i. 放上新點數如同步驟(1)
                     ii.挪動現有點數
          (3) 重複步驟(1)或是步驟(2)直到大家都同意現在的估算。


結束這個步驟之後,會得到評估後的結果


Recap一下Animal Point Workshop的執行步驟:

  • Step 1:比較大小
  • Step 2:校正基準
  • Step 3:評估程度

心得

在玩Workshop的過程中,有的團隊有面臨到意見不合的衝突,但是經由充分的討論以及一再地向PO確認需求,最後總是能達成共識。也有PO根本不知道這張卡的需求為何?所以團隊很有共識地給予那張卡一張問號,代表PO要先回去搞清楚,是不是很符合現況呢XD


結論

導入SCRUM 或是Planning Poker的方法進入團隊是道門檻,而今天筆者介紹的Animal Point Workshop有個好處:簡單。越簡單的東西才越容易導入到團隊裡。相信經過這個Workshop的練習能夠讓團員們體會相對估算的精神;幫助他們熟習一起估算的方式;在討論中達成共識。大家一起估就能消除個人主觀的因素。整個團隊估出來的東西才會比較客觀。

另一方面,這種簡單的相對估算,可以幫助團隊快速地區分需求複雜度,團員們不用再苦惱到底怎麼估才能估出一個精準的工時,對公司跟團隊都是一種”win-win situation”喔。

參考資料
估算需求複雜度(2)Dog Point Game
A Fast Story Point Estimation Process

需求怎麼估? - Animal Point Workshop Part I - 估需求前必須知道的事

需求怎麼估? - Animal Point Workshop


2015.04.24 星期五
我很榮幸在Agile Meetup新竹場分享這個Topic


其實這場Topic的靈感是來自於91學長上次的Dog Point Workshop
http://www.codedata.com.tw/social-coding/estimation-with-dog-point-game/
只是我這次有調整了一下講課內容以及workshop的流程

這邊就先整理一下今天的內容吧

今天這場sharing 主要分兩個部分
上半場主講估需求前必須知道的事
下半場就讓大家來玩Animal Point Workshop

來先談談估需求前必須知道的事吧

在任何的軟體開發流程中,需求估算永遠不會消失。
或許很多朋友認為估需求是相當困難且痛苦的一件事,或許很多朋友把大量時間花在冗長的估算上但始終也估不準。
今天這堂課將則是引導出需求估算的另一種方向 - 相對估算
課程將會以Workshop的方式進行,用一個有趣的案例,讓學員們實際操作,體會相對估算的精神。

首先 我請大家先思考一下
目前自己的團隊中對於估需求這件事是否遇到什麼問題?


主要的想法是要解決問題前
至少要知道問題是什麼吧

於是我就請學員們分組討論
5分鐘後請每組挑出三個最重要的問題來分享
以下是學員們的分享:

  • 估不準
  • 照著被訂好的deadline估
  • 每個Sprint的工作量不一
  • 總是被分派到類似的任務
  • 需求不明確
  • 需求超出能力
  • 團隊對工時有落差
  • 範圍太廣很難估

或許今天的內容無法解決他們的問題
但是釐清問題就是解決問題的一大步了

接下來就進入主題了

I. 估需求前必須知道的基本原則

  • 相對比較 比 絕對評估 簡單
  • 小任務 比 大任務 容易掌握
  • 使用 Planning Poker 來估

原則一 : 相對比較絕對評估 簡單
我請大家進入一個情境 : 假設今天你要爬樓梯
請問大家這24層樓的大樓以及101登高賽分別要爬多久?


要很快地回答要爬多久其實有點困難
但是要比較兩者之間的難易度就簡單多了

我們不知道每一棟高樓實際要爬多久
但是知道彼此的相對關係

所以估相對關係真的比較簡單


原則二 :  使用 Planning Poker 來估
我一樣請大家進入一個情境 : 假設今天你要評估肌肉痠痛的程度
一樣是爬樓梯
面對1層樓、3層樓或5層樓甚至是40層樓應該是不一樣的痠痛程度吧!
那我們如何很快地評估肌肉的痠痛程度?
其實可以參考費氏數列 (Successione di Fibonacci in wiki)


費氏數列的特性是越後面的數字,差距越大。
當數字小的時候,你感覺得到差距


可是當數字大的時候,你卻分不出誰大誰小,反正都很痛苦就是


所以費氏數列很完美地詮釋了需求越大,不確定性越大的特性。
我們可以利用這個特性來對需求快速的分類
這邊呼應了原則一,我們對於評估實際的數值感到困難,但評估彼此的相對比例會簡單很多。
當數字小時,即使保守點取較大數,也不會造成太大的影響
當數字大時,不用糾結於40或是41的差別

而Planning Poker正是使用類似費氏數列的數字牌卡
所以這邊推薦大家使用Planning Poker


II. 評估時的注意事項

Who - 誰來估?


你累了嗎?來聽個故事好嗎?
照片裡的主人翁是個小力士,這個祕密被邪惡老爸發現了之後,規定他一分鐘之內要搬10包尿布!但是實際上小力士只能搬2包。
請問各位如果你是小力士,作何感想?
小力士:實際搬的人又不是你! 真是OOXX
這種情境總是一再上演阿!所以誰要來估?當然是有做事的人才來估。而且要大家一起評估,估出來的結果才會客觀;大家也會達成共識;團隊也有參與感。

所以誰來估?
由做事的人一起評估

When – 何時估?
還沒分派任務前估


原因是將個人因素降低,估出來的結果才會比較客觀。

What – 評估因素
我們在評估這個需求時,可以就這三個角度來思考 :

  • 複雜度
  • 重複性
  • 風險

這邊是參考之前讀的一本書:
Scrum Shortcuts Without Cutting Corners: Agile Tactics, Tools, & Tips

小結
為何推薦大家採用這套相對估算方法?

  • 簡單
  • 客觀評估
  • 達成共識
  • 自我承諾


簡單
越簡單的東西才越容易導入到團隊裡。尤其要改變大家平常的工作習慣,必須想辦法簡單到無縫接軌,或是讓團員們有感覺到好處。才容易導入成功。

客觀評估
大家一起估,就能消除個人主觀的因素。整個團隊估出來的東西才會比較客觀。或許你會問,那估錯怎麼辦?那就下次改進囉!我們也可以利用每次的Retrospective Meeting修正一下估錯的因素。

達成共識
大家一起估的東西,才會達成共識。

自我承諾
我一直都認為自己開出去的支票,比起被別人assign,總是會更想努力地兌現。而這套方法是Member大家一起估的東西,等於是自己承諾的份量,他們肯定會想辦法完成的。

下一篇就來談談Animal Point Workshop怎麼玩喔
需求怎麼估? - Animal Point Workshop Part II - 實際動手玩

參考資料:
估算需求複雜度(1)Story Point 與 Planning Poker

2015-04-14

[瀑布底下玩SCRUM] CM的Retrospective Meeting經驗談


最近趁著 I6Sprint結束,打鐵趁熱地在部門內辦一場 Retrospective meeting。算算日子轉到 CM Team也已經 9個多月了,從 6.0 SP3 I2開始推動 Retrospective meeting,至今也已經舉辦過4場。但過去的方式都是傳統式的ㄧ個ㄧ個地表達意見,雖然還算open-minded,但是有時候仍會被前面講過的idea影響,有些同仁則是反映都是那幾個人在發表。

所以這一次我特意換成外界SCRUM愛玩的那一套便利貼Feedback法,事前先請同仁就I6這個Sprint先想一下以下三個主題:
1. Good
2. Should be improved 
3. New

當天會議的流程如下:
1. 回顧上個Retrospective Meeting Result
2. 報告這個Sprint的相關統計資訊
3. Brainstorming for good (5 minutes)
4. 大家輪流上台貼便利貼及說明
5. Brainstorming for improved(10 minutes)
6. 大家輪流上台貼便利貼及說明
7. Brainstorming for new (5 minutes)
8. 大家輪流上台貼便利貼及說明
9. 分類 improved & new的便利貼
10. improved & new中選出3項下個sprintaction item
11. 討論解決方案

這次我特別將good, improved, new 分成三個部分來分開討論
用意是希望同仁們可以更focus on目前的topic

或許是這套方法引發大家源源不絕的想法吧?
或許是大家對團隊很多期待吧?

還滿開心看見當天同仁們滔滔不絕地發表看法,不過也讓會議時間到了2小時仍是無法結束,所以很可惜最後並沒有跑到投票與討論solution的流程。
會議結束後我把黑板上的便利貼拍下來,後續會整理成文件以便下次使用。(Post-Mortem Meeting還能拿來用)

幾點心得分享
1.     時間還是必須要控制,實在run太久了。
2.     這次的方式的確激發出大量意見,大家也都在台上侃侃而談,我覺得效果不錯。
3.     最後還是沒能跟QA一起舉行是有點可惜。
4.     聽到同事們支持與稱讚這次Sprint推行的方法其實還蠻有成就感的,原本還擔心會造成大家的負擔,不過就結果論來看,從”win-win”的角度切入真的比較容易推行喔。

2014-12-21

[反省] 學習是要正面主動積極的

昨天看到學長開的課終於結束了 心中好是後悔

其實我在課程一開始就跟公司申請要去上這門課

結果卻被拒絕了

原本我有打算就算沒經費 也要自費去上課

不過卻被幾個負面思考打斷了這個念頭

1. 現在用不到
    說實話 真的用不到 這套作法要導入我們部門 確實有點窒礙難行
    不過 話說回來 即使目前環境用不到 但對我自己來說 一定也是有幫助的

2. 老婆會抗議
    因為上課會花掉三個星期六全天的時間 我很感謝平日老婆的辛苦
    周末就盡量花時間陪伴家人
    所以當初這也是個考量因素之一

3. 經濟問題
    雖然課程費用不貴 但對最近的我 自掏腰包額外掏出這些費用也是有點痛的
    
其實念頭就在一念之間
從想報名上課到索性就不報了的念頭也不過幾天

但結果卻是相當後悔的

希望下一次 我能好好想想 學習是個人的 應該要更主動一點


2014-12-18

[讀書筆記] Design and Testability

Design and Testability

1. Why should I care about testability in my design?

In a testable design, each logical piece of code (loops, ifs, switches, and so on) should be easy and quick to write a unit test against, one that demonstrates these properties:

FICC

  • Fast
    • Runs fast
  • Isolated
    • Is isolated, meaning it can run independently or as part of a group of tests, and can run before or after any other test
  • Configuration-free
    • Requires no external configuration
  • Consistent
    • Provides a consistent pass/fail result
If you were doing test-driven development, you’d have no choice but to write a testable system.

2. Design goals for testability

2.1 Make methods virtual by default

Java makes methods virtual by default, but in .NET, you need to explicitly set it as virtual so you can override it in a default class.

An alternative is to have the class invoke a custom delegate.

Using virtual methods is handy, but interface-based designs are also a good choice.

2.2 Use interface-based designs

Refer to chapter 3~5

2.3 Make classes nonsealed by default

If you can’t inherit from a class, you can’t override any virtual methods in it.

2.4 Avoid instantiating concrete classes inside methods with logic

Tests might need to control what instance is used in the class under test.

Solution:
(1) Use the external tools such as Mock tool
(2) Ways in the 3rd chapter such as Factory Method.

2.5 Avoid direct calls to static methods

Try to abstract any direct dependencies that would be hard to replace at runtime.

Solution:
(1) Ways in the 3rd chapter      
      Abstract a static method away using the Extract and Override refactoring.(2) Avoid using any static methods whatsoever
(3) Trying to minimize the number of singletons or static methods

2.6 Avoid constructors and static constructors that do logic

Things like configuration-based classes are often made static classes or singletons because so many parts of the application use them.

在Constructor建立多個邏輯或是static constructor 會因為很多地方有使用到導致難以替換

Solution:
(1) IoC Container

2.7 Separate singletons and singleton holders


SRP: Single Responsibility Principle

原則上就是將該做事的Class跟產生Singleton的Class權責分開
好處是 :
(1) SRP
(2) 可以替換

Sample:

原本的設計 Singleton

Singleton Holders抽出


3. Pros and cons of designing for testability


  • Amount of work
    • Let’s just say that more code, and work, is required when testability is involved, but that designing for testability makes you think about the user of your API more, which is a good thing.
    • 工作量增加是一定的 但是能多用User的角度來設計 這是好事
  • Complexity
    • Over design
    • 能用Tool來克服 (e.g. ReSharper)
  • Exposing sensitive IP
    • IP: Intellectual Property
    • Workaround : 
      • keeping things internal and using the [InternalsVisibleTo] attribute
    • Compromise
  • Sometimes you can’t
    • Political or other reasons


4. Alternatives to designing for testability

If a tool comes along that solves the testability problem for you, there will be no need to design specifically for testability.

5. Summary


Testable designs are what SOLID design principles have stood for. 
The end goal should not be testability, but good design instead.

2014-11-27

[讀書筆記] The pillars of good tests

[讀書筆記] The pillars of good tests

1. Writing trustworthy tests

2. Writing maintainable tests

[Maintainability]
Nonmaintainable tests are nightmares because they can ruin project schedules, or you risk losing the tests when the project is put on a more aggressive schedule.

test project 也會越來越多 如果難以維護的話
1. 會破壞Project Schedules
2. 不想再測試

2.1 Testing private or protected methods

Unit tests should be testing the public contract and public functionality of an object

應該要針對Public的來測

Solution:
(1) Making Methods Public
If a method is worth testing, it might be worth making it public, static, or at least internal, and defining a public contract against any user of it.
如果你的Method值得測試 那就將他變成Public的吧
      
(2) Extracting Methods to New Classes
如果Method包含了許多獨立的logic 就將他抽出吧

(3) Making Methods Static
如果Method沒有使用其他變數 可以考慮變成Static的

(4) Making Methods Internal
如果上述方法都失敗 有個最不推薦的方法
[InternalsVisibleTo("TestAssembly")]

Removing the method isn’t a good option because the production code uses the method too. Otherwise, there would be no reason to write the tests in the first place.

移掉Method其實不是一個好選項

2.2 Removing duplication

The “don’t repeat yourself” (DRY) principle
code有重複 就有壞味道

舉例來說:

上面看起來目前很合理
但如果寫了另一個Test

如果Production code 改變了 勢必要回來改這兩個TestMethod
導致更多的maintenance work
假設現在new完LogAnalyzer之後 要先呼叫Initialize()

那麼 我們必須在每個TestMethod裡都要加上呼叫
Initialize()的動作

Solution:
(1) Removing duplication using a helper method
透過GetNewAnalyzer()將 Initialize()封裝在這個Method
如此只要維護這裡即可

(2) Removing duplication using [SetUp]
另一種方法是寫在SetUp Method中
但是缺點就是 不是每個TestMethod都會用到這段邏輯
所以比較不推薦這種作法

2.3 Using setup methods in a maintainable manner

SetUp Method很好用 但是要注意會有以下問題:
(1) Initialize objects that are used by only some of the tests
(2) Having SETUP code that’s lengthy and hard to understand
      Refactor it

(3) Setting up fakes in the SETUP method
      要考量Fake Objects 是否每個Test Method都會用到

2.4 Enforcing test isolation

原則:
A test should always run in its own little world

如果Test Isolation沒有做好 勢必會相互影響導致錯誤的結果

以下介紹4種沒有隔離的狀況
(1) Constrained test order
      測試一定要按照某種順序
(2) Hidden test call
      在測試中呼叫其他測試
(3) Shared-state corruption
      共享的資源沒有回復
(4) External shared-state corruption       
      外部共享的資源沒有回復
Constrained test order
i. Flow Testing
   通常面對Flow Testing 會產生這種順序問題 所以一個建議的方式不要在UT中測試流程 或這是是採用Integration testing framework

ii. Laziness in cleanup
    也有可能是因為懶得清理資源 才導致必須按照某種順序來執行

Hidden test call
i. Flow Testing    
    同上

ii. Trying to remove duplication
    我們可能會為了不想要寫重複的code而在TestMethod中呼叫一個已經寫好的TestMethod 但是千萬不要這麼做

iii. Laziness in separating the tests
     別懶得抽出

Shared-state corruption


2.5 Avoiding multiple asserts

Create a separate test for each assert
Use parameterized tests
Wrap the assert call with try-catch


2.6 Avoiding testing multiple aspects of the same object

Create a full object to compare all the properties in one assertOverriding ToString(), let the test output much clearer

2.7 Avoiding overspecification in tests

OVERSPECIFY TESTS that Developers make:
Specifying purely internal behavior
Using STUBS also as MOCKS
Assuming an order or exact match when it’s not needed
xxx

3. Writing readable tests

xxx

2014-11-06

[讀書筆記] Interaction testing using mock objects

[讀書筆記] Interaction testing using mock objects

[前言]

在前一章Stubs 我們使用了Stub 來打破了Dependency
但是現實上 卻有很多的function是

沒有回傳值
沒有存狀態

針對這些Function該如何測試呢?

答案是 Mock Objects


1.1 Value-based vs. state-based vs. interaction testing


Value-based testing 
    Checks the value returned from a function.

State-based testing 
    Checks the noticeable behavior changes in the system under test, after changing its state.

Interaction testing
    Tests how an object sends input to or receives input from other objects—how that object interacts with other objects.

舉個例子:
假設有一個灌溉系統

Value-based testing 
    Check 水龍頭是否可以打開

State-based testing 
    Check 土壤濕度

Interaction testing
    在水龍頭端裝置一台監控設備 紀錄灌溉的起始結束時間以及水量 只需檢查監控設備的次數及水量是否正確

Sometimes state-based testing is the best way to go because interaction testing is too difficult to pull off.

State-based testing 有時是最好的測試方法 因為Interaction testing實在太難達到了

[Definition] 
Mock object
A mock object is a fake object in the system that decides whether the unit test has passed or failed. It does so by verifying whether the object under test interacted as expected with the fake object. There’s usually no more than one mock per test.


1.2 The difference between mocks and stubs


[Definition] 
Fake
A fake is a generic term that can be used to describe either a stub or a mock object, because they both look like the real object. Whether a fake is a stub or a mock depends on how it’s used in the current test. If it’s used to check an interaction (asserted against), it’s a mock object. Otherwise, it’s a stub.

Mocks 跟 Stubs最主要的區別如下圖:

Stub:
呼叫Assert的是 TestClass
code的例子:


Mock
用Mock Object來確認Test Pass or not


code的例子:


1.3: A simple handwritten mock example


假設新增一個需求:
當LogAnalyzer收到一個長度短於8的filename就呼叫外部WebService去記錄LogError

測試上 我們用MockWebService來替換掉外部WebService
此時我們要測的是 WebService是否確實有記錄到LogError


Why don't we write the tests directly inside the mock object code?
Reason:
1. We’d like to be able to reuse the mock object in other test cases, with other asserts on the message.
    要Reuse Mock Object

2. If the assert were put inside the mock object, whoever reads the test would have no idea what we’re asserting.
    寫在Mock裡 其他人會不知道在assert什麼


1.4 Using a mock and a stub together


假設再次新增一個需求:
如果WebService發生了Exception 系統要寄email給IT管理員

此時LogAnalyzer有兩個外部Dependence

如何測試當Exception發生時 有確實發送了Email?


Questions:

  • Why are we doing several asserts in a single test? How easy would it be to separate this test into three different tests with one assert each?Could the three asserts be combined into a single logical test?
  • It can be quite tedious to create manual mocks and stubs for each test or test class. How can we overcome that?
  • Couldn’t we have used the MockService from listing 4.1 as a stub?


1.5 One mock per test


Principle:

  • In a test where you test only one thing
  • Only one mock object in a test
  • Other fake objects are all stubs


1.6 Stub chains: stubs that produce mocks or other stubs


當一層接一層時 怎麼測試?
ex. 

你可能要寫 factory 跟 service兩個stubs
或者 Confuguration 跟 DBConfiguration兩個stubs

假如你想要替換掉 connstring
Solution:
1. 用Extract and Override    


2. 用Adapt Parameter Pattern


1.7 The problems with handwritten mocks and stubs


1. It takes time to write the mocks and stubs.

2. It’s difficult to write stubs and mocks for classes and interfaces that have many methods, properties, and events.

3. To save state for multiple calls of a mock method, you need to write a lot of boilerplate code to save the data.
<boilerplate : 照本宣科的規範;(新聞業)一成不變的陳腐文字>
為了在多次呼叫Mock Methods之後儲存狀態 需要寫很多code

4. If you want to verify all parameters on a method call, you need to write multiple asserts. If the first assert fails, the others will never run, because a failed assert throws an exception.
如果需要check 一個method的所有參數 需要多個 assert
但是只要一個assert Fail 就會中斷這次測試


5. It’s hard to reuse mock and stub code for other tests.